Thursday, April 3, 2014

Spring Colour Paint Trends

Spring Colour Paint Trends 
 
“Berger” one of Australia’s leading paint brands continues to find greys and reds are clear favourite colour choices when painting either the inside or the outside of your home.
Berger has a wide selection of colours to choose from but these continue to come up trumps.
Colours such as Cabinet Grey, Flirty, Press Release, Shaded Lane, Sparkling Red, Octavius Oak and Red Hot Poker remain in Berger’s top 20 selected colours and have done for the past few months.
Lisa Christie, Colour Consultant from Inspirations Paint & Colour, has many tips for incorporating greys and reds into your next painting project.
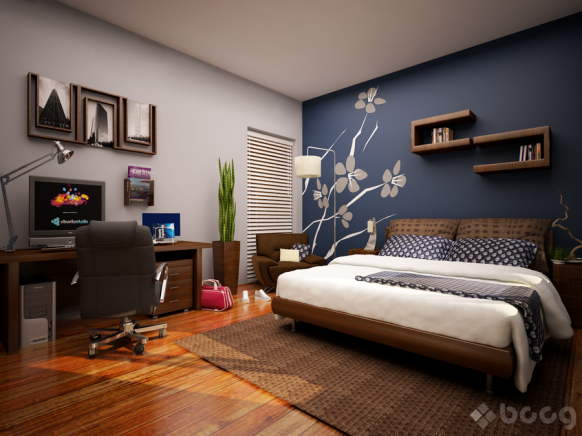
“The combination of Greys and Reds is magic!” Christie says.
The colour grey, especially the darker shades, gives a room great depth. Remember that grey is a neutral colour and will go with most colours easily. If your room is south facing, be careful with pale greys, as they can be cold and gloomy especially if there’s no sunshine in the space.
Combined with grey, red is a great accent colour. Reds need to be used carefully though, if you don’t think the room can use a splash of red, use it in your furnishings or opt to paint the smallest wall in the room to ensure it’s not to over powering. Try Berger “Red Hot Poker” a great colour that does all the things a good red should do.
The greys popularity has been linked to the continued hangover from the global financial crisis resulting in a period of uncertainty. This insecure period is reflected in a new sense of design: a more pared down aesthetic rule, which has lead to maintaining or buying products of vintage that will endure the test of time.
Incorporate reds, there’s no better way to celebrate the past and keep old traditions alive when reviving old objects and creating new masterpieces.
How to: Choose the right colour for your home
Looking at paint sales and international trend forecasting for colour trends is always a good place to start, but it is important to adapt these findings to your own painting project for optimum results.
Berger has some handy hints to assist in choosing colour:
• Review the existing colour scheme of your home and identify colours that you want to keep – a home makeover doesn’t always require a complete overhaul; you can update your colour scheme whilst keeping some existing elements
• Research classic colour schemes for the heritage of home and incorporate colours accordingly
• Find an item of inspiration – Lisa Christie says: “You may start by finding a curtain, bed cover or upholstery fabric that you like and the colours in the fabric will lead you into a scheme, or it might be a painting or a piece of furniture that sparks your imagination.”
• Remember that when you first see the bare walls painted in a bold colour they may appear strong, even overwhelming, but as soon as you have added carpets, furniture, pictures, lights and soft furnishings to the room, the effect will be dramatically reduced
• Need help? Engaging a colour consultant is money well spent in the colour choosing process. Visit www.colourconsult.com.au for more information.
Most importantly, Christie says, “Colour in the form of paint is the most inexpensive and the most high impact decorating tool available to you.”

www.montespainting.com 

Monday, January 20, 2014

Color On an Accent Wall alone makes a room Zing!


If you’re afraid of using too much dramatic color in a room, you can play it safe — and still
make a bold statement — by painting just one wall with a splash of accent color. Color on an accent wall alone makes a room zing without being overbearing. However, picking which wall to paint in the room is the secret behind success in this strategy. Many variables will be in play, and the careful home decorator needs to consider these variables before putting a paint-laden brush to the drywall.

1

Consider basic “color theory” and how warm hues — reds, oranges, yellows — play tricks on perception. Warm colors will tend to pull a wall towards the eye. If you paint a wall bright red, for example, that wall will seem closer to you than a white wall. Pick a wall that can tolerate being “fore-shortened” like this, perhaps the farthest or longest wall in the room. Using this color theory, painting a side wall red can make a room feel too narrow, but painting an end wall in a long, narrow room will make the room feel more balanced in size.

2

Harness the color theory effect of cool hues too — blues, greens and purples. Cool colors have the opposite effect of warm hues as they push walls away from the eye. You can make a short room seem longer, or a skinny room feel wider, by painting an end wall or a side wall in a cool hue.

3

Define the “visual temperature” of the natural light in the room. If your room is located on the east or north side of your home, the quality of light entering the room during the day through the windows is cooler than the warmer light coming from a southern- or western-facing window. Rooms with warm-hued accent walls work best in eastern or northern rooms for this reason. Rooms with cool-hued accent walls are best for western or southern rooms. A western-facing wall painted orange will feel like an oven once you add light, while a northern-facing wall painted aqua will feel like an igloo.

4

Balance “color impact” with existing features and planned furnishings. A dramatic accent wall will lose much of its impact or “pop” if it’s mostly obscured behind a mass of floor-to-ceiling draperies or the wall is covered with art work, moldings or large pieces of furniture. In contrast, an accent wall that is almost fully exposed can bring too much “pop” to a room too. Choose an accent wall that won't be too bare of or crowded with other design elements.

5

Discover your ideal “special feature” wall. Accent walls work best when there seems to be a logical reason why a particular wall invites special treatment, compared with other walls in the room. A dramatic architectural feature like a fireplace or an antique armoire may be good reasons to make a special wall stand out with color. Determine the “reason” why a wall might be painted with a standout color by asking a friend to enter your room and then quickly tell you which wall attracts her eye first. In most cases, the wall chosen will be the inherently “special” wall in the room.

Montes Painting 2014

Wednesday, December 4, 2013

Holiday Decoration Ideas

33 Christmas Decorations Ideas Bringing The Christmas Spirit into Your Living Room

Christmas Living Room 28 33 Christmas Decorations Ideas Bringing The Christmas Spirit into Your Living Room
Christmas decorations should all be about “magic”. And what better way to welcome Christmas spirit, than forgetting all the bad, focusing on what truly matters and turning your home into a miniature festival of joy? For today we decided to  gather a collection of beautiful living rooms, all of them featuring charming holiday decorations. We believe that transforming the core of your home- whichever that may be- into a  cozy and colorful interior, the magic can take place. Each of the rooms presented in this post exudes a happy feel and seems ready for many cheerful guests. Whether it is a fireplace with stockings that brings warmth to an interior, a decorated Christmas tree, a colorful lighting installation, or a creative message on one of the walls, the living room is the focal point of many residences and should set the tone for the entire house. We invite you to have a look at the photos, get inspired and by Christmas time- who knows?- perhaps you will even share your Christmas decorations with us and our readers. – Also make sure to check – 10 Beautiful Christmas Tree Decorating Ideas

More At: http://freshome.com/2011/12/05/33-christmas-decorations-ideas-bringing-the-christmas-spirit-into-your-living-room/

Montes Painting 2013

Friday, November 22, 2013

How To Spray Paint Metal Furniture

Apartment Therapy Tutorials


DIY Project: How to Paint Vintage Metal Pin_it_button
I recently came across this adorable little vintage milking stool at a pop-up shop, and couldn't wait to get it home. I've been looking for a small step stool to live in my kitchen and this one is sturdy and balanced enough (it's stronger than it looks) for me to use as a quick "leg up." When, I got it, the stool's paint was cracking and peeling, so I couldn't wait to get it home to put this glossy, new orange coat on it.


DIY Project: How to Spray-Paint Old Metal Pin_it_button

The stool, before.
For this project, you will need:1. A piece of metal furniture or lighting that you want to paint! Mine was a vintage metal milking stool.
2. A metal specific spray paint + primer. I used Krylon Dual Paint + Primer in Mandarin Gloss3. Medium grain sandpaper
4. A wet rag or paper towels
5. A cardboard box or drop cloth + parchment paper (if painting a small piece)
6. Face mask (optional, but advised)

Instructions:


DIY Project: How to Paint Vintage Metal Pin_it_button
1. In a ventilated area, sand your metal piece with medium grain sandpaper to rid it of obvious paint peeling, rust, and to create a good surface for spray paint. If you think there is a chance that the original paint may be made of lead, wear a face mask and clean the up the paint dust as you go.

DIY Project: How to Paint Vintage Metal Pin_it_button
2. When you are finished, wipe the metal down with a damp cloth or paper towel. Get rid of all of the dust, oils, and sediment.


DIY Project: How to Paint Vintage Metal Pin_it_button
3. After laying down your drop cloth or cardboard box, and in a well ventilated area, spray thin coats over the entire piece and allow for adequate drying time. If you are using a separate primer and paint, do the primer first and follow directions on the side of the can. I usually do the bottom of the stool/table/lamp first so that I can focus on finishing the visible area perfectly. Repeat this spraying and drying process until you are satisfied with the color and opacity.


DIY Project: How to Paint Vintage Metal Pin_it_button
4. Allow to dry for a good 36-48 hours before using. Place the object onto parchment paper to prevent sticking (if small).

http://www.apartmenttherapy.com/how-to-spray-paint-metal-furniture-apartment-therapy-tutorials-190845DIY Project: How to Paint Vintage Metal Pin_it_button
There you have it! Good luck with your projects!

 Montes Painting 2013

http://www.apartmenttherapy.com/how-to-spray-paint-metal-furniture-apartment-therapy-tutorials-190845

Wednesday, November 13, 2013

How to Paint Over Marker Stains on Walls


A quick touchup covers marker stains on walls.
A slip of the pen, or marker, can mar the paint on your wall and the look of your room. Whether the stain is an accident or the product of an artistic child, properly painting over it is the only surefire way to get the wall back to its formerly pristine state. The dye used in markers will bleed through interior paint, eventually showing up on the wall again. Preparing the wall surface before you paint prevents this bleed-through.

1

Wash the wall around the marker stain with water and mild detergent, such as liquid dish soap. Rinse with clear water and allow the wall to dry completely.

2

Sand the area you are repairing with a fine-grit sanding sponge, extending the sanding approximately 3 inches beyond the marker stain in all directions. Sand only enough to slightly roughen the wall surface; do not sand through the existing paint or attempt to remove the stain by sanding. Brush the dust off the wall after sanding.

3

Paint a coat of latex stain-blocking primer over the prepared stained area. Apply a thin coat extending over the area you sanded. Allow the primer to dry. Apply a second coat of primer if needed or recommended by the manufacturer.

4

Sand the primed area lightly with the sanding sponge. Paint adheres better to a slightly roughened surface.

5

Apply a thin coat of latex paint over the primed area. Use the same color and type of paint as used on the rest of the wall, whether it's glossy, semigloss or matte paint.

6

Brush on a second coat of paint after the first coat is dry. Apply up to three coats of paint if necessary to match the patched area to the surrounding wall.

Things You Will Need

  • Liquid dish soap
  • Fine-grit sanding sponge
  • Stain-blocking primer
  • Paintbrush
  • Latex paint

Tip


The shade of the paint will appear different than the surrounding wall when it's wet. Allow the paint to dry thoroughly before applying additional coats so you can correctly judge the color. 


Wednesday, November 6, 2013

Before and After

Harbour  Square (Toronto, October 2012)


Before
 

After
 
Before
After
Before
After

Monday, November 4, 2013

Paint Like A Pro


Color Combinations for Your Home

Berry, putty and burgundy decorated roomThe fastest way to jump-start any makeover? Introduce colors that suit your rooms, your style, and your life. Here are exciting, foolproof paint picks (plus gorgeous accessories) to get you going. Follow the link for more details (www.realsimple.com).

Monday, October 28, 2013

Before & After

Aileen Lewis Ct (Markham, July 2013)

BEFORE
 
 
AFTER
 
 
BEFORE
 
AFTER
 
 
BEFORE
 
 AFTER


 MORE PICS AT


Thursday, October 24, 2013

Painting Tips


 CLEANING UP AFTER PAINTING A ROOM

You've finished your painting project, ensuring that everything in the room was covered before you started. Still it is inevitable that some paint will manage to flick or splash somewhere. Removing all your painting equipment carefully from the room will help to eliminate any accidents.

Paint on Fabric

It is obviously sensible to wear old clothes or overalls and old shoes while painting, as paint can be very difficult to remove from clothing. If you do accidentally manage to get some paint on decent clothing, it will be easier to remove once dry - otherwise you run the risk of spreading the paint and embedding it in the clothing, making it almost impossible to remove. Try working the paint out of the fibers with plenty of warm water and scrubbing with a small brush. Depending on the type of material, you may be able to cut off small blobs of paint from the surface.
TIP: Painting professional Pam Estabrooke, of ProTect Painters, suggests, "Rubbing alcohol is a great product for removing paint from clothes. Use regular drug store alcohol. Take a paper towel and saturate the fabric and stain. Use your fingernail or small wood stick to scrape and work the alcohol into the fabric to loosen the paint. Periodically apply more alcohol and blot any loosened paint. After several minutes, the stain should be completely gone. Wash the garment immediately per label instructions."
Paint on carpets may also be difficult to remove. Again, any blobs on the surface may cut of easily; otherwise, as with clothing, use plenty of warm water, but blot, don't scrub, as this may damage the pile. Stubborn paint spots may loosen off by gently using a blunt knife. Always work in the direction of the pile and then blot dry.
Always fold dust sheets in on themselves before removing to shake outside. Make sure that you always know which is the clean side of your sheets before you place them back down the next time you paint.
TIP: Pam reminds you, "Frequently check the bottom of your shoes. You do not want to track wet paint out of the room and onto other floors."

Paint on Windows and Fixtures

When removing masking tape from the edges of windows and carpet edges, always make sure the paint is dry first and peel the tape off gently - never rip it off quickly. Any paint on windowpanes can be scraped off with a bladed scraper. The glass can then be washed and polished with a chamois leather. Professionals recommend waiting two weeks before having interior or exterior windows professionally cleaned after the trim is painted. It can take paint this long to thoroughly dry and cure.
Any spots of paint on fixed fittings can usually be removed by wiping with a damp cloth. For more stubborn spots, try scraping very gently with a blunt knife, taking care not to scratch any delicate surfaces.
TIP: Pam suggests, "While the furniture is pushed away from the walls, take a few minutes after the drop clothes are picked up to vacuum, dust or mop the floor under these pieces. It may be a few years before you move them again. Be careful of the trim if it was freshly painted too."

Paint on Applicators

An important job to do as soon as possible after painting is to clean out paintbrushes and rollers. It is very important to clean them all thoroughly after each painting session; otherwise you will constantly need to replace them.
Remove excess paint by either working the brushes on newspaper, or running a scraper carefully over the bristles. Then try to get the worst of the paint off in a bucket of water. Water base paints wash out very easily under running water once the worst of the paint has been removed.
Oil base paints need to be cleaned in a bowl of white spirit first, then rinsed under a running tap. Finally, wash them in soapy water and give them another rinse. Remember, if you are working with alkyd paints, the paint and the solvent are volatile. Wear a respirator and use adequate ventilation. Beware of open flames and never store or simply throw away solvent soaked rags. Soak the rags in water overnight
Shake out all excess water from the paintbrushes, and wrap them in wax paper and then seal with a rubber band. This will help them to retain their shape.
Rollers used for water base paints can be washed in the sink, by part filling it with water and rolling the roller back and forth. Finally, rinse under running water until the water from the roller is clear. The curved section of the 5-in-1 tool is designed to remove paint from the roller. Run this curve up and down the roller under running water to aid in cleaning the roller.
For oil base paint, rolling it in a paint tray containing white spirit can clean out the roller. Finish off by washing in soapy water and rinsing thoroughly. Hang rollers up to dry once they are clean.
TIP: Pam says, "Many good quality paint rollers are reasonable priced. Weigh the difficulty of cleaning the roller with its cost. Most painters consider these disposal supplies and just throw them away."
A good tip for keeping brushes soft and ready to use later in the day without the need for cleaning, is to wrap them in cling film. This will exclude air and prevent them from drying out. In the case of rollers, wrap them in a sealed plastic bag.

Paint on Your Skin

Finally, unless you wear gloves, it is virtually impossible to keep paint off your hands. Luckily there are a number of special hand cleaners available which are very effective in removing paint from the skin without causing any irritation.
Always make sure that all the paint is thoroughly dry before you begin to clean up. Although clearing up can be a very tedious task, it is an important part of any job and ensures that you always have clean reliable equipment available for your next project.

Montes Painting 2013

http://www.doityourself.com/stry/cleanupafterpainting#b 

Sunday, October 20, 2013

Before and After

Haddington Ave (Toronto, July 2013)
 
BEFORE
 
 
AFTER
 
 
BEFORE
 
 
AFTER
 
 
BEFORE
 
AFTER
 
More Pics At


box ad